Mud Cups

img_2292

HAPPY HALLOWEEN!!!!!!

And here’s a treat that your little ones will love to help you create!  (I know. I know.  As if they won’t be getting enough treats, right?  But, you can bring these in to the Teachers or to church or to the Library, or the neighbors…)

Let the sweet adventure begin!

img_2280

You will need to purchase 16 oz of refrigerated sugar cookie dough.  Leave it out at room temperature for about 15 minutes, before you are about to begin baking.

img_2281

Grease 18 muffin cups.  (You’ll just put a little water in the empty 6 cups, right before you put them in the oven so that the cooking remains even.)

img_2282

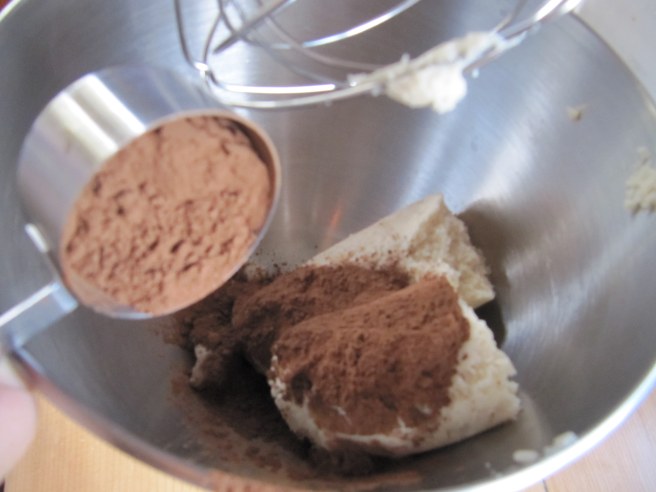
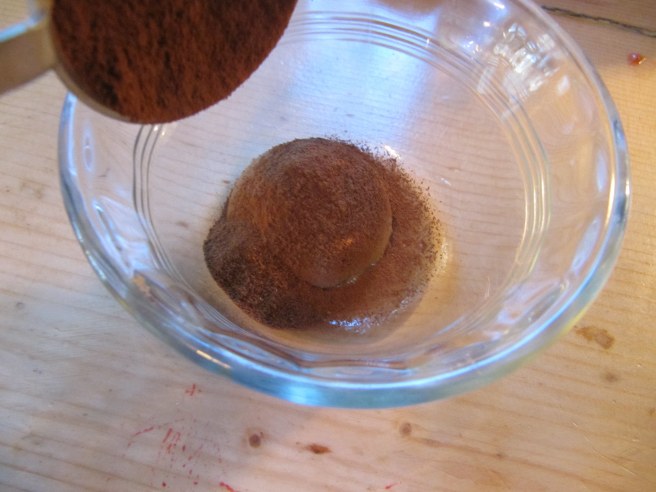
Add 1/4 cup unsweetened cocoa powder to the softened sugar cookie dough into the bowl of a stand mixer.  Whisk together until cocoa powder is well incorporated.

img_2283

Turn mix out onto the counter with a spatula.  Divide mixture into 18 portions.  (Cut in half, quarters, eighths, 16ths and then wing it!)

img_2284

Let those cute, pudgy little hands get to work rolling those portions into “meatballs”.

img_2285

Put the “meatballs” into the greased muffin cups.

img_2286

Press onto bottoms and up the sides of the muffin cups.  Bake in preheated 350 degree oven for 12-14 minutes.

img_2287

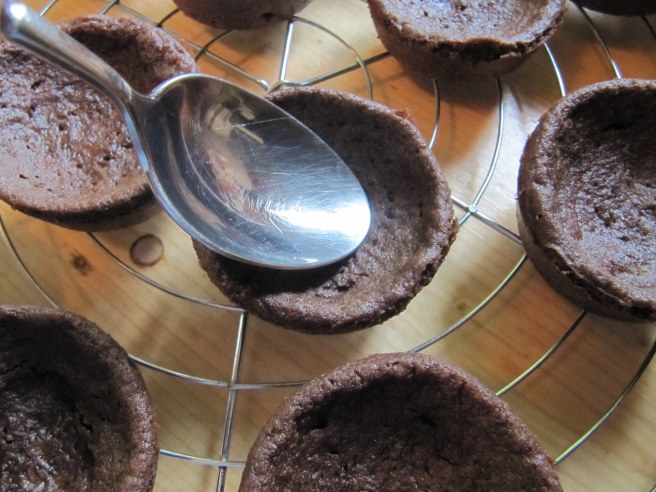
Cool in the pans for 10 minutes.  Remove to wire racks.  Gently press down the middle of each cookie with the back of a spoon.  Let cool completely.

img_2288

Here are the ingredients you’ll need to complete your mud cups:  About 10-15 Oreo cookies, run through the food processor, 3 containers (4 oz each) yummy chocolate pudding, gummy worms, and your cookie cups.

And now for the assembly…the kids love this part!

img_2289

Spoon some of the chocolate pudding into the center of each cup,

img_2291

sprinkle with oreo crumbs,

img_2292

and finish with a couple of worms!

Bon Appétit, Ma Chérie!

Swedish Apple Pie

img_2239

I was having my father-in-law over for our weekly Monday night dinner and had no time to prepare a dessert.  I looked around the kitchen, spotted the giant bag of apples I’d picked with my little Beach Rose and thought of this recipe.

Prep time cannot be more than 15 minutes. Soooooo easy and so impressive and most importantly, absolutely spectacular.

Oh, and did I mention that it retains its crispy crust for up to at least 4 days after it’s made?  (I only know about the 4 day crisp-retention because my husband begged that I keep it for him to bring a piece to work from Tues-Friday and he said it was out-of-this-world!)

Let the sweet adventure begin!

img_2229

In a tiny bowl, mix together 1 Tablespoon of brown sugar with about 3/4 Tablespoon of cinnamon.

img_2228-001

Peel, core and slice about 4 apples (Whatever you have on hand works!  I used MacIntosh and they were amazing…).  I say “about” because you want to fill a 9-inch pie pan about 2/3 of the way full with the sliced apples.  It’ll be tempting, but don’t go over the 2/3 line! (Or somewhere in that vicinity.)

Squeeze a slice of lemon over the apples.

img_2230

Sprinkle the apples with the cinnamon-sugar mixture, and gently move around to coat all the pieces.

img_2231

In a medium bowl, combine 3/4 cup of melted butter with 1 cup of brown sugar,

img_2232

1 cup of flour,

img_2233

and 1 large egg.

img_2234

Mix with a fork until all ingredients are incorporated.

img_2235

Use a spatula to pour over apples and spread over them.

img_2236

Like so.  Pan should be about 3/4 full.

img_2237

Just in case your pan is a little on the full side, place your pie dish on a foil lined cookie sheet to avoid messy clean-ups!

Bake in a preheated 350 degree oven for 45 minutes.

img_2238

Mmmmmmmm!

img_2241

Serve hot, warm or room temperature with vanilla ice cream.

This will definitely become a go-to recipe for “apple pie”.  Simple to make, not many ingredients, most of which you have on hand, barely any clean-up, and delicious for days!

Bon Appétit, Ma Chérie!

Books by the Door

IMG_2243.JPG

There is nothing more exciting to my little Beach Rose than to go exploring in the woods, on the beach, on a walk to the corner.  “Exploring for treasures” is what she likes to call it.  And though she is the treasure for me, it is quite lovely to see the world through her eyes and get as excited about nature as she is.

Discovering “treasures” can be even more fun when you know what they are called!  So often my Baby would find a shell at the beach and ask me what it was called and I didn’t know.  So, I said to myself, well it’s easy nowadays to get an answer for just about anything, so how do I make this info readily available at my fingertips for our nature adventures?

A mini-library by the front door.  Books and pamphlets on birds, bugs, flowers, trees, seashells, animal tracks, etc…

She is so proud of herself when I tell her to run and get the seashell book and find the shell in her hand and she does!  And it is great to embrace how little I know.  The wiser you get the more you realize what a fool you are…isn’t that the saying???

Well, with these resources literally at our fingertips it really makes it fun and easy to learn something new every day!

How Well Do You Know Your Iron?

IMG_9389

Well, how well should I know my iron????  What kind of silly question is this?

Per usual, I speak from experience when I say that it is soooooo important that you familiarize yourself with your iron or whichever iron you’re about to use (at a hotel’s, a relative’s, etc) on your beautiful dress.

Learn from me.

Do as I say, not as I did!  Save yourself the trouble, my dear!

I was on my honeymoon at a resort in the Caribbean, getting ready to go out to a beautiful, ritzy restaurant.  I decided that my gorgeous dress with layers of tulle and was a bit too wrinkled from the trip in the suitcase to be seen in that evening.  So I turned on the iron, waited 10 minutes and plopped it on the top layer of my dress, the 1st layer of tulle.

I’m going to let you guess what happened next…

Yup.  You got it.  I watched in horror as my dress was eaten up by the iron.  And by the time my delayed reaction of yanking the iron off my dress was realized, the room smelled like burned toast and there was a gaping hole in the back of my little black cocktail dress.

Almost 2 decades later and it still hurts to think about it, never mind talk about it.

What I should have done was get to know the iron.  Read the settings which usually have a number corresponding to the type of fabric you are about to iron.  And therefore, you turn the dial on the iron to the number that indicates the fabric you are about to iron, so that you don’t burn delicate clothing!

And I believe that with extremely delicate items of clothing, perhaps after setting the iron to the correct temperature you want to “test” on the tiniest portion of the fabric, in the most inconspicuous place, in case it does burn through.

So perhaps starting with the dress inside out and working on that layer first, at the lowest possible setting on the iron may have saved it that fateful night…

We’ll never know, but at least I may save you from the same kick to the stomach!

Brown Sugar Bear Doesn’t Work!


Screen Shot 2016-10-25 at 8.04.58 AM.png

Perhaps you’ve had a different experience than I with this cute little brown sugar bear.  It is made of specially fired clay that, after being soaked in water for 20-30 minutes, is supposed to help maintain the moisture in your bag of brown sugar so that it remains soft and clump-free for up to 6 months.

I don’t think so…at least, not in my home!  My box of brown sugar was hard as a rock a couple of weeks after I’d put the cute little bear in there, and there were clumps of rock-like pebbles of brown sugar surrounding it since they’d gotten wet when they first made contact with him and then hardened up.  Yuck!  And frustrating, since I was trying to make a batch of chocolate chip cookies and my tummy was grumbling and now I had no brown sugar immediately available!

Here’s my secret.  It’s fail-proof.  I’ve never had a problem since I started doing this…

img_2242

Once you’ve opened that bag of brown sugar, grab a small ziploc plastic bag to seal it in.  Then store that bag-within-a-bag in the brown sugar box or whatever container it came in or you like to store it in.

Always soft and always moist.

Sorry little bear.  Maybe I’ll try to use you in a bag of crackers or chips to suck out moisture and keep them crispy.  But, I’ll be sure to put your heavy little body at the bottom of the bag to avoid digging into a bag full of crumbs the next time I want a handful of Cape Cod’s!

Oil Temperature

img_2224-001

This is what happens to me all the time…well, whenever I’m about to fry something anyway…I get excited about heating up the oil and turn the stove burner on too high.  The oil ends up much hotter than I needed it to be and … now what do I do?

3 things I can tell you from experience:

  1. Start your burner at medium heat.  You’ll most likely find that frying temps of 350 – 375 degrees are found at a medium heat setting, or thereabouts.  Adjust the dial as necessary.
  2. If you’ve become overzealous and you started by setting your burner on high, your oil temp is probably sky-high, as shown above.  You can either add more oil to the pot to lower the temperature (if you happen to have more oil on hand and don’t mind using up a lot more of it) or …
  3. you can remove your pot from the burner, allow the oil in the pot to cool to the temp you want while you turn the burner down to around medium!